Adapt a Toy - Do it yourself 35 step by step
Procedure - Instructions on how to solder and how to disassemble / reassemble
Jack Hammering Bob the Builder Toy


Toy adaptation for special needs handicapped children with
disabilities. Children who work with occupational therapists, and speech
therapists need these switch activated toys. If you need another
toy adapted instead of this one, you can send it to me and I will adapt the toy
and create a procedure like this one and put it on this web sight.
EMAIL:
bdwhaley@scienceshareware.com
This is an approach that I took
to make an adaptive toy out of Jack hammering Bob the Builder tm. It
is now being used successfully at a local elementary school here is Olympia WA
by special needs children. This toy says 1 of 3 different phrases, then he
starts running his jackhammer full tilt- it vibrates and tickles when you
touch it. The vibration only lasts for 15 seconds.
Note
this approach to adapting Bob the Builder will NOT disable the existing button
that is used to trigger it (this is a good thing so you can use it even when you
don't have an
adaptive switch
handy). This method of installing a jack will require you to install a
small pair of wires from a PCB (Printed circuit board) to a 1/8" mono jack.
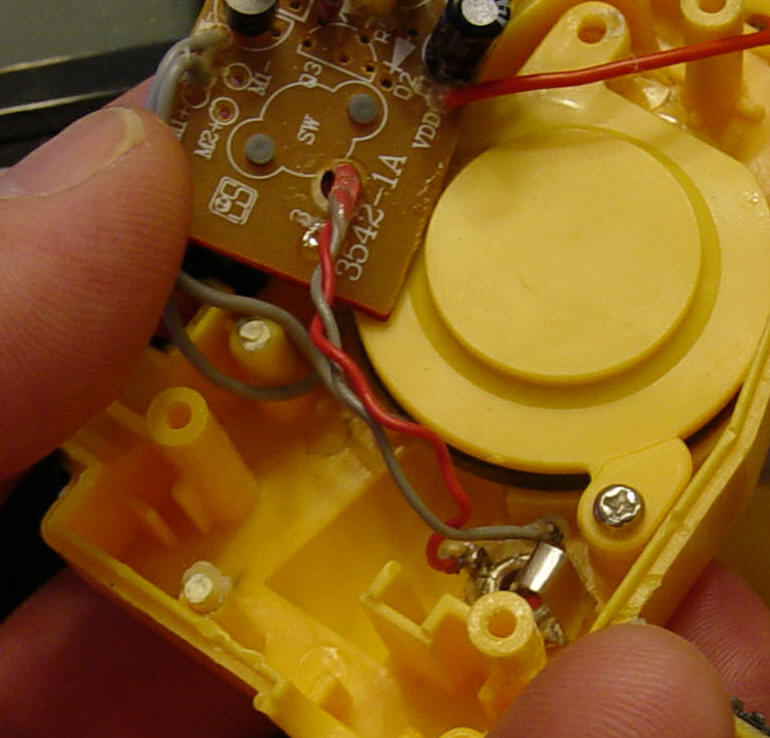
Take a look at the grey and red wire in this photo by clicking on this picture →

This may take you two Bob the
Builders before you get this right. It is best to work about 1
hour at a time. This is because if you are impatient like me, you
begin to get careless. If you get careless you will mess up the toy.
Plan on it taking you 3 to 5 sessions to do this project. PATIENCE and
careful thinking is the most important part of this project!!!!
Materials needed: Soldering iron, glue gun, scissors or wire
cutters, sewing needle and strong thread, an empty egg carton to organize
all the screws in the order that you took them off, 1/4" drill bit, a drill,
1/8" mono jack (PN# 274-251 from Radio Shack), 8 inches of wire (size 26AWG
stranded, or size 28AWG stranded), wire strippers or strong finger nails,
a cheap $10 volt meter, a 1/8" drill bit, a small vice to hold your work while you are soldering it,
safety glasses, a well ventilated area, small round file to size the hole for
the jack if needs be.
Note: Do
this project at your own risk, be careful and safe! By using this
procedure you agree to take full responsibility for toy damages or
personal injuries. This is what can
happen with a hot soldering iron. Click on the soldering induced
blister image below to see large version of the blister on the finger.

Below are step by step instructions for adapting the toy Bob
the Builder with a 1/8th inch female jack from radio shack.
You can click on each picture to see a large view of that picture.
First
it is necessary to remove the batteries from Bob the Builder's back.
Don't worry, he won't mind. Remove the screw from his battery area. This screw is under the
batteries, so you have to take out the batteries to see it and unscrew it.
 Cut
the the thread that hold's Bob the Builder's hands to the handle of the
jackhammer
 BE
VERY GENTLE in pulling Bob the Builder's jackhammer out his abdomen.
Remove it JUST enough to unscrew the 3 screws on the back side of his
jackhammer. (see photo of the jackhammer to the right) Next
you need to take the screw out of each handle of the jackhammer. See
picture for details.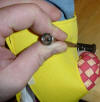 NOW
FOR THE SCARY Part. The Jackhammer is glued together. It
has to be gently pried apart. The prying DOES break 3 small plastic
guide pins but this is OK because the screws are strong enough to where you
don't really need the guide pins. See photo Just go around
the Jackhammer with your screwdriver gently prying along the edge. If
you have a hair drier, you might want to use it to heat upt he the
jackhammer first so it comes out easier.
DONT LET THE SCREW DRIVER SLIDE OFF AND POKE YOUR
HAND!!!! IT HAPPENS!


Next it is necessary to
remove the grey rubber button from off of the circuit board located in the
jackhammer NOTE!!! be VERY gentle with this button. It
will tear easily! Which means you will not be able to operate the
Bob the Builder with the button that exists in the toy anymore.
Next obtain a 1/8" mono phone jack (see photo) Simply lay the jack into the spot shown in this picture to make sure that it
fits ok.
 Now
take a mechanical pencil and make the lead stick out 1/2" so you can mark
the hole in the center of the jack. You can use a small nail also to
do this. This mark is very important because it is where you
will drill a 1/4" hole. So keep the mark in the very center of the
hack hole. If you are off to the side just a little bit the jack will
not fit correctly in this small area.
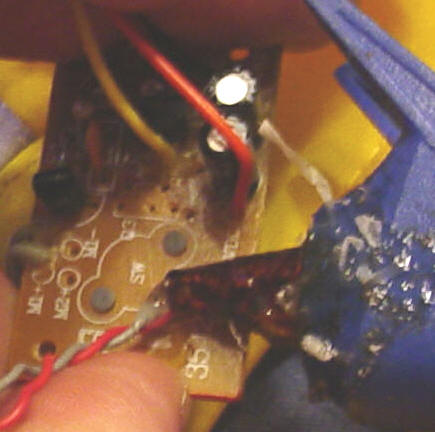
 When
I tried to fit the jack in, it did not work at first because the small ring
that screws onto the jack did not lay flat because some plastic was in the
way. So I used my soldering iron to melt away a little bit of the plastic-
please look at the photo. DO THIS VERY SLOWLY. A little at a
time. This makes really yucky smoke. Do not breath it in.
Use a fan on your work area to provide fresh air.
 Now
try and mount the jack to make sure everything fits. See photo
 Now
it's time to prepare the ends of two wires to solder to the jack.
First strip about 1/8" of housing from the wire using wire strippers or your
finger nails. 
Now
it's time to prepare the jack for soldering. It is very important to
heat the jack up hot enough so the solder will stick to it successfully.
The only problem with this is that it will burn your hands if you try and
hold it. So you must use a small nail, or small screwdriver, or a male
jack plug to hold it still when you are working on it. See photo

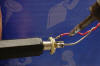
Now
you are ready to solder the wires to the jack. Secure the jack in a
vice or have some one hold it for you while you hold the soldering iron with
one hand and the wires with the others.
Now
cut your two wires at about 6 inches and tin the other ends just like the
photo.
Now
obtain a 1/8" drill bit (see photo)

Using
the 1/8" bit drill a hole as shown in the picture. That the hole is
just to the side of the spot where the grey rubber button used to be.

Solder one of the wires down on the spot shown in the photo. This is pretty
easy because there is a nice big spot to solder down to!!

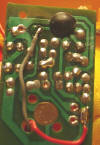
Now
comes the tricky part. Soldering the other wire down on the PCB
(printed circuit board). You must prepare the area by scratching the
green photo resist layer off the trace (see the photo) You can use a small
piece of sandpaper or sharp object for this like a small screwdriver. WARNING!!! DO NOT
SCRAPE TOO MUCH , you will damage the copper trace that lies just under the
green layer of film. BE VERY PATIENT!!!!!!

Now
that you have prepared the spot to solder down the 2nd wire, you can get
your other wire and solder it down. BUT First, put the two wires
through the hole you drilled with the 1/8" drill bit. Just like this
photo. NOTE!!! The spot where the grey wire in the picture is
connected is VERY delicate!! Do not pull on it. Be very patient and
gentle!!!!!!
Now
put the rubber button back onto the circuit board. (See photo)
HOT
GLUE GUN- It's time to secure the grey wire using a hot glue gun or epoxy.
See PHOTO
Next
it's time to glue gun the spot where the wires come through the 1/8" hole.
NOTE: Only put a little bit and flatten it out with a flat something -
(like a flat screwdriver) because if you put too much, it will slide back
into the spot where it came from.

Next
you can put some hot glue on the jack to make sure the Bob the Builder's
Jackhammer does not shake the wires loose after a couple years of heavy use.
This is your choice to do . I'm just being cautious.
Next
it's time to test the electrical connections. This is a sanity check
to make sure everything is working as it should. Put the batteries
back int he back of Bob the Builder.
NOTE!!: At this point Bob the Builder is LIVE!! If you touch the jack with
something that is metal, it might cause him to start jumpin around all over
the place. If this happens, just stay calm, and remove one of the
batteries out of the back before some of your wires get ripped off of the
PCB. Turn on your volt meter to
measure a DC voltage under 10Volts. Measure the voltage at the
terminals of the phono jack. You should get between 4.0 and 5.0Volts. See the
picture: If you short a screw driver across the two wires, it
should wake up ol Bob the Builder - but pop out the battery as soon as it
happens!

If you don't get the 4.4VDC rating, make sure
your volt meter is working by measuring the voltage on each of your
batteries. Each on should be 1.5 volts or so. Also, check the
orientation of the batteries that you installed to make sure they are
positioned correctly. If you can't figure out what is wrong,
send me an email with a picture of your wiring, and I will try and help you.
EMAIL Now
tighten the ring that holds the jack in Bob the Builder's jack hammer This
is what it should look like at this point inside of Bob the Builder's
jackhammer
Now it's time to re-install the
PCB. There is one problem here. Do you remember where you drilled the hole
with the 1/8" drill bit? Well if you put too much hot glue there, you will
have a tough time sliding the PCB back in. So BEWARE!

OK,
Now you are ready to put Bob the Builder's jackhammer back together.
Note: this is where you BETTER make sure it works first. Push the
button!

Remember that 3 of the glued posts got broken when you pried this apart.
It's best to remove them if they are not going to slide nicely back into the
respective holes. MAKE SURE your red button is back in
place.
Now
put the screws back in and put new thread back into the handles to hold Bob
the Builder's hands correctly.
Put
the batteries back in and plug in your switch and give him a whirl!!
Here are some typical switches.

|